
In the golden age of forums and social media, being able to take awesome photos of your keyboard is must.
I mean, how else are you going to show off your setup?
As someone who has struggled in the past to take good product photos, reviewing dozens of keyboards has required me to improve quickly.
While I might not be a photography expert, I can share a few tips I’ve learned along the way that many people can benefit from.
It’s time to turn your potato photos into pure gold.
Let’s get started.
How To Take Better Photos With Your Cell Phone

Most people don’t own a fancy DSLR camera or expensive lens, and that’s totally ok. Cell phone cameras are sharper and better than ever nowadays.
So, here’s what you need to know.
If you’re totally new to photography and want to get the basics down, you can shoot in automatic mode, but eventually we want to get away from that.
We’ll start with the easiest improvements and work our ways to the harder stuff.
1. Improve the Framing


Framing is by far the most important aspect when taking shots of your keyboard.
You want to take photos with angles that work well with your lens type and don’t distort the image.
For example, notice the angle of the keyboard on the left? It’s directly head on.
This results in a the keyboard shape looking non-rectangular and slightly curved. This is a poor lens for this type of photo. Not the most flattering.
You would need a special lens to take that photo.
Instead doing a direct shot, you can try a better angle. There are ways to capture the photo in a more accurate and attractive way.
Notice how the photo on the right looks less distorted and how much more aesthetic the keyboard looks. It shows the shape of the case, the keycaps, and draws your focus more.
Framing is powerful stuff and easy to mess with.
2. Better Composition

Taking photos that are off-center or with poor composition will negatively impact your photos a ton.
There is a basic rule in photography called the rule of thirds.
If you imagine your photo is divided by intersecting lines, you want to put the features of interest in those locations.
For example, the location of the switches in the image above.
This rule will lead to better composition and framing of your shot. While the rule of thirds is quite flexible (and not an end-all-be-all rule), it’s a great place to start if you want to make your photos look better.
It’s an excellent way to visualize where someone will look at a photo first. They typically start in the top left corner, move downwards, and then move to the right side of the photo.
If you’re more interested in composition there is a ton of different ideas to play with, so definitely do further research. If you’re starting out, keep the rule of thirds in mind when setting up your next shot.
3. Better Lighting Is A Must

See the way the lighting hits the headphone amp and reflects? There is no harsh shadows or anything.
Most shooting locations have poor lighting, which is why many people result in using studio lights to have full control of their environment (we are guilty of this).
But chances are, you don’t have any studio lights.
I would recommend using natural light for your shots. Taking photos near a window can give you the perfect lighting for your photos. Ideally, a nice overcast day will give the perfect soft lighting for a good keyboard photo.
Unfortunately, you can’t always wait for perfectly overcast weather.
If the sun is shining bright, you’ll find that the shadows look harsh. A simple solution is to place a white sheet over your window to soften the light and get rid of the harsh feel.
You can also use white paper to reflect light onto multiple sides of the keyboard. Both of these options can result in better lit photos.
Lighting is a tricky beast and takes a lot of practice to get down.
You can also use a lamp and put white cloth in-front of it for a super simple lighting setup.
4. Props & Background


If I needed a photo of a Cherry MX Blue switch, which of the above photos looks more interesting?
The one on the right for sure.
Adding props to the background of your photos makes them much more intriguing to the eye.
The photo on the right picks up the texture of the coiled cable, the design of the desk mat, and the sharp angles on the keyboard.
The photo on the left is just a bed sheet.
Adding props can add life to your product photos. Try finding a few items around your house and place them around your keyboard. You’ll find the photos look much better.
Remember the rule of thirds and you can compose the photo better.
We have a bucket of props that we circulate through to add more flair to our images. It consists of keycaps, cables, keyboards, and more. Feel free to get creative.
5. Adjust The Camera Settings
In this section, things will start to get a bit more technical, so I’ll try to avoid going too much into detail.
If you get confused, feel free to Google the terms. There are people out there that can explain it much better than me. I’ll just put everything in terms of taking photos of keyboards.
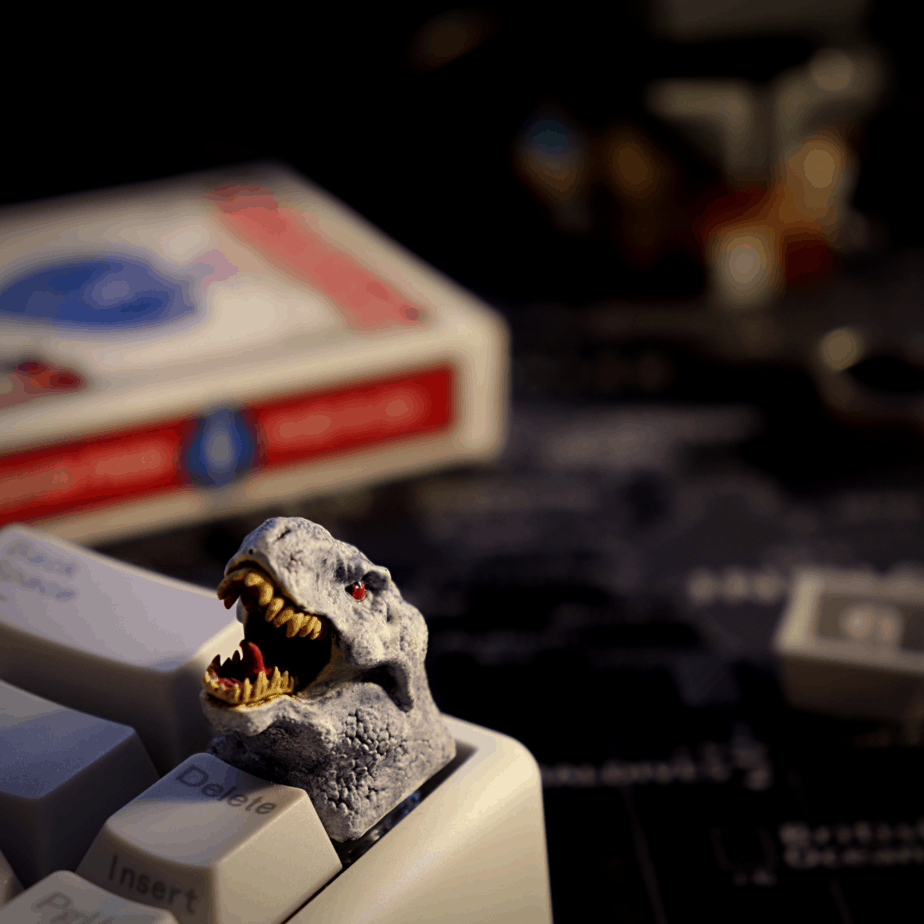
On most cell phones nowadays you are able to tweak the shutter speed, ISO, and aperture.
While all three are very important in photography, let’s focus on aperture.
Notice the blur in the background behind the dinosaur keycap? This is from a really low aperture setting.
Putting the primary item in sharp focus with everything else out of focus can lead to more intriguing shots.
It also adds a nice depth of field.
The image doesn’t feel flat, it’s like there are layers to the shot.
Setting the aperture as low as possible is an excellent way to bring depth of field into the photo.
Adding a deck of cards, a Star Wars Lego figurine, and an upside-down keycap really elevates the background further.
Here is my recommendation if you’re starting out:
- Set the ISO as low as possible
- Set the aperture as low as possible
- Adjust the shutter speed to capture enough light
And booyah, better photos instantly.
You might have issues steadying the camera enough, in which case a tripod can help a ton.
Other Areas To Improve Your Photos
For some of you, this article may be a bit too beginner with not many advanced tips.
My main focus was to try and help the potato photos look a little less potato. If you already have the framing, composition, lighting, and props down, there are other ways to improve as well.
Some areas that I’m still working on are the use of software to improve the photos further.
You can throw your images into Adobe Lightroom and Photoshop to remove blemishes, improve the colors, and hone everything in.
And of course, if you really want to, you can upgrade your camera gear and buy a collection of lens.
Macro lenses can drastically improve the amount of detail captured in each photo and take your game to the next level. They tend to be a bit pricey.
But for most, a cell phone camera and cheap tripod will get your 80% of the way there.
You can always buy a macro lens for your cell phone if you want a cheaper upgrade as well.
Conclusion
Whelp, that was four quick tips for taking better photos of your keyboard, keycaps, and switches. I don’t want to see any more horrendous photos floating around Reddit and our Discord.
Take a little time to play with the settings, lighting, and background.
As I mentioned before, I’m by no means an expert. As a matter of fact, I would still consider myself a beginner. But that just means I can empathize with the potato photos more than most.
If you want to see some truly bad photos, you don’t have to go too far into our older posts to find them.
Good luck and happy photo-taking!