
Desoldering may seem overwhelming and complicated at first, but it’s actually easier than it looks. Once you learn all of the steps to do it, you’ll be desoldering all of the switches confidently with ease.
There are many reasons to desolder mechanical switches, and we’ll dive into those reasons and more frequently asked questions in our FAQ below the step-by-step tutorial. Let’s dive into it. Make sure you read all of the steps and get a good understanding of the process before picking up and turning on your soldering iron.
Tools Required
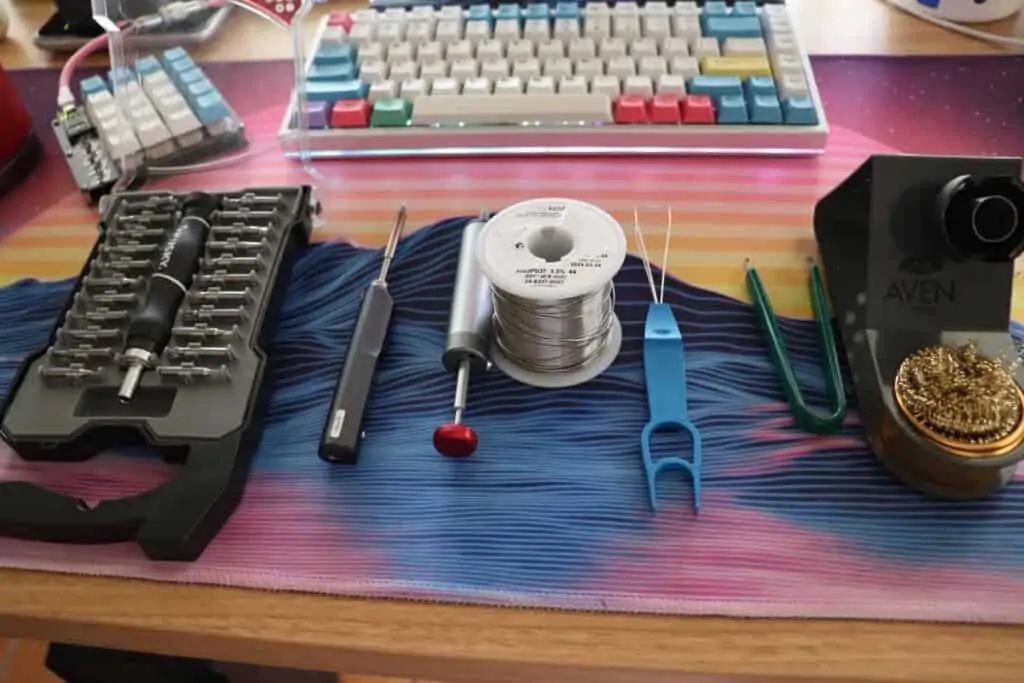
In this method to desolder that we’ll be going over, you will need several supplies. There are other ways to desolder as well, but we found this to be simple and inexpensive.
1. Soldering Iron With a Stand and Brass Cleaner

A good soldering iron will be one that has adjustable temperature controls. Whether this is a full soldering station or a handheld soldering iron, you will want to read through the instruction manual and understand how to turn on/off, change the temperature, and put the soldering iron on standby as well.
We use the TS100 soldering iron. It is portable and has a screen to tell you the temperature on the side of the iron. Another helpful item to have (but not required) is a soldering stand with tip cleaner attached.
The reason we recommend a stand is primarily for safety reasons. You want to put your soldering iron in a safe space that will prevent you from accidentally touching it. Brass cleaner is essential to keep the tip of your iron clean after multiple uses. Or else the solder can accumulate on the tip, making the job messier.
Useful tip: If you want to have all of the products/gear that we recommend, check out our complete checklist for building a custom mechanical keyboard.
2. Solder Wire

Good soldering wire will help you get the job done right without all of the trouble. A good soldering wire will either be 60/40 Sn/Pb or 63/37 Sn/Pb. this means that its 60% tin and 40% lead. Having more lead in your solder will make desoldering easier and is ideal for fine electronics.
3. Solder Sucker
A solder sucker is a cost-effective and efficient way to desolder switches from a keyboard. These are also called desoldering pumps. Essentially, they suck up the liquefied solder using a pump that you press in for each use.
4. Large Space Outdoors OR A Ventilation Fan
When working with solder, it is ideal to do so outdoors or with a ventilation fan. The fumes that emerge from heating up solder is toxic for you and can cause long-term breathing problems.
5. The Keyboard That You Want to Desolder
Of course, you will need the keyboard that you want to desolder. Or at least the PCB.
6. Switch Puller
Having a switch puller is useful for plate-mounted switches. If you’re working with PCB-mounted switches, you will not need to have a switch puller. It just helps you take off the switch from the plate.
7. Keycap Puller
Having a keycap puller is useful if you have not yet disassembled your mechanical keyboard. If you have your PCB ready to desolder, jump right into the steps.
8. Precision Screwdriver Kit
Having a screwdriver kit is useful to take apart any mechanical keyboard and separate the PCB from it’s case.
How to Desolder a Keyboard Switch: The Steps
Make sure you understand all of the steps before you attempt to do it because once you fire up your soldering iron, it can only remain heated for so long before the handle starts heating up.
1. Disassemble Your Mechanical Keyboard

If you already have your PCB separated from your case, jump to step 2. If not, this is where you do that.
To disassemble your mechanical keyboard, first remove the keycaps from the switches using a keycap puller of your choice. Make sure to store them in a secure location away from where you will be desoldering. You don’t want to accidentally melt the fine plastic of your keycaps.
Next, find the screws that keep your case together. These are usually found on the bottom of your keyboard case. If they’re not visible, they may be underneath the rubber feet that keep your keyboard from sliding away.
Once the case is opened up, you most likely have to separate the PCB from its mounting posts onto the bottom part of the case. There are screws on the PCB itself, placed in between the switches. Unscrew these and keep all of your screws in a secure location. If you have magnetic holding trays, this is a great time to place all of your screws in them.
Now you can put away or push aside your keycap puller, switch puller, and disassembly materials.
2. Place Everything on a Heat Insulated Mat
Next step is to place your PCB onto a heat insulated mat, especially if you’re working on a table that can heat up quick and melt. Even if you’re not, using a heat insulated mat will protect you and all of your parts as well. If you don’t have a heat insulated mat, using a desk mat (or two) will work as well to protect the surface you’re working on.
Make sure you’re working in a well ventilated area. We recommend doing this outside, but if your only option is inside, make sure a window is open and a fan is on to blow the fumes away from you.
Have your soldering iron, solder sucker, and solder wire available to your side in a convenient access location.
Safety tip: Wear some kind of eye protection, so that no splattering gets into your eyes. It doesn’t need to be Z-87 rated goggles…but at least some glasses of some sort. We like to use blue light filtering glasses (only because we’re wearing them anyways).
3. Determine Which Switch Needs to Be Desoldered

If you’re going to desolder every switch, then you can skip this step and go onto Step 4.
If you do only want to desolder a specific switch, be sure to know exactly which one it is. A good way to do this is to mark the bottom of the switch that you want to desolder, either with a small piece of tape or a dry-erase marker.
It’s extremely easy to turn your PCB around and then lose track of which switch you want to desolder.
4. Turn on Your Soldering Iron

Depending on your soldering iron, turning it on can involve flipping the switch or pressing a button.
Select a temperature for your soldering iron. I have had much success with around 350-380°C. With prebuilt keyboards such as Razer or Corsair, you may need to push the temperature a bit higher because their solder has a different composition that melts at a higher temperature.
Let your soldering iron tell you once it reaches the set temperature. Usually your soldering iron has a certain amount of time it can run before it becomes too hot for you to hold comfortably (at least mine is like that).
When the soldering iron is ready, tin it by adding a small amount of soldering wire to it. This helps the iron transfer heat onto the solder joint you want to remove.
Safety tip: Make sure your soldering iron is on a stand of some sort to avoid accidentally touching it. It is a very high temperature and can cause burns quickly. We recommend this stand because it comes with a tip cleaner and completely encases the tip.
5. Prepare Your Solder Sucker
Have your solder sucker ready by your side. Push the plunger down to prime the pump.
If you’ve used the pump before, make sure that there is no remaining solder in the pump or the tip. It there still is solder there, the desoldering will not be as effective.
6. Prepare Solder Wire (For Step 9 If Needed)
If you are desoldering a stock prebuilt mechanical keyboard from a big company, you probably do not want to skip this step. You may have to be prepared to lay down more solder onto the joint to remove the previous solder cleanly.
Depending on the solder you have, this can look like unreeling a bit of solder from your spool. If you have it in a cylindrical container, this could look like taking it out and separating a piece at the top.
7. Heat Up The Pad Where the Switch Pins Are

Grab your soldering iron, press the tip of the iron onto the pad, making sure to also touch the pin.
Hold it there with medium pressure for about 2 seconds. You will see the solder becoming more liquid.
If the solder is not becoming more liquid, then you may need to use a higher temperature on your soldering iron. The solder sucker uses air to suck our the solder, the temperature will have to be higher because the air will cool it down.
8. Use Solder Sucker to Suck Up Solder

Now as your iron is heating up the pad and the solder, position the solder sucker tip on top of the iron and the pad (with the soldering iron tip still there). Press the button to suck up the solder.
Now you can remove the soldering iron tip from the pad, clean the tip with the brass cleaner, and set it back into its stand. Observe if the solder has been removed or not.
If the solder has not been removed, it can be many reasons. Either the solder wasn’t hot enough and the sucker was not able to pull it all out. Or there isn’t enough lead in the previous solder’s composition, making it harder to work with. Proceed to Step 9.
If the solder has been removed, then you are done desoldering your mechanical switch. Congratulations!
We will be writing a full step-by-step buide on how to solder your mechanical keyboard switches soon.
9. Add Additional Solder onto the Joint (If Necessary)

For this step, the temperature of the soldering iron will work best between 320-350°C. Adjust your soldering iron’s temperature and wait for it to cool down from the previous step.
Have your solder wire ready in your off-hand to feed it. Press your hot soldering iron’s tip onto the pad, making sure to touch the pin for about 2 seconds with medium pressure.
Now start feeding the solder wire onto the solder joint (not onto the soldering iron, that doesn’t actually do anything but accumulate solder on your iron). Feed the solder for about 2 seconds. You’ll know you are done when the solder joint has a concave look to it, and you can still see the mechanical switch pin.
Now that you have added solder onto the joint, it’s time to repeat the steps we did earlier to suck the solder out of the joint.
10. Repeat Steps 7-8
Repeat the previous steps 7-8 to use the solder sucker to suck out the solder. Remember that the temperature to remove solder is actually higher than the temperature to lay down solder. Eventually you’ll figure out the ideal temperature for soldering and desoldering that works for you and the iron and solder that you are using.
Congratulations! You removed your switch from your keyboard and successfully desoldered it.
Make sure to turn everything off and put them in safe places so no one else will accidentally bump into the iron and tip it over.
Safety tip: Wash your hands immediately after you are don’t working with solder. Even ingesting small amounts of lead is bad for your health.
Frequently Asked Questions
Why Would You Want to Desolder Your Switches?
There are many reasons why someone would want to desolder their mechanical switches.
Replacing a Broken Switch
One reason to desolder a switch is to replace a broken one. A broken switch may not be registering anymore when you press it, but it can also be a switch that chatters or repeats inputs even if you press the key only one time.
Lubing Your Mechanical Switches
Perhaps you want to lube your mechanical switches and don’t want to use the different methods to lube switches without desoldering. You would have to desolder all of your switches to get access and pop open your switches.
Lubing Your Stabilizers
Fortunately for you, lubing your stabilizers requires only a few switches to be desoldered. If you’re using a keyboard with plate-mounted stabilizers, only the switches that are under the stabilizers need to be desoldered.
If you’re lubing stabilizers on a keyboard with PCB-mounted switches, then you will have to desolder every switch to have access to the stabilizers.
Replacing All of Your Mechanical Switches
Another reason to desolder is that you’re tired of the switches that you’re using now and want to change over to a completely new set of switches. This is quite a tedious job, but it’s a great way to upgrade your current keyboard to something that’s more custom and premium feeling.
What Is The Best Solder to Use?
The best solder to use is a solder that has a high percentage of lead such as 60/40 Sn/Pb or 63/37 Sn/Pb. This allows the solder to melt at a lower temperature which is good for working with fine electronics. Having your solder iron be at really high temperatures can cause the PCB and pads to burn, which obviously isn’t a good thing.
What Solder Sucker Should You Use?
We recommend getting the Engineer SS-02 solder sucker, linked in our recommend gear page. It’s extremely easy to use and small enough to work with just one hand. It also is easy to maintain and clean as well. It also won’t break the bank at under $50.
What If You Don’t Have a Solder Sucker?
If you don’t have a solder sucker, there is a way that you can desolder switches with just solder wire and a soldering iron. However, if you encounter a badly soldered joint, this will be difficult to do. A great tutorial on YouTube demonstrates this.
Another way is to use a wick. This is inexpensive and comes in a long reel. You can see it in action here on YouTube.
What Soldering Iron Should You Buy?
We recommend the TS100, which is a portable soldering iron with an OLED display telling you the current temperature and whether it is heating up, cooling down, or ready to use. There are other good options such as the TS80 and Hakko FX888D. Our recommendations are linked on our gear page.
Why Does Adding More Solder Help You Desolder?
When you are desoldering, and there are small bits remaining inside the joint, adding more solder allows all of the pieces to stick together and form a large blog. When you are sucking up the solder, the big blob is easily pulled out. It also allows the solder to remain liquid for a longer period of time before the air cools it down.
My Switch Still Isn’t Working After I Replace It, What Do I Do?
It can be one of two options. Your switch is broken or your PCB is broken where the pads are that connect the pins to your PCB. To test the PCB, use tweezers to connect both pads where the pins are supposed to stick in using a switch tester and see if it registers. If not, the pads are most likely not working properly.
To test the switch, you can put them into a hot-swappable mechanical keyboard and see if it works or not. Also, you can try using another switch too. If you know the PCB works and another switch works, then your previous switch is broken.
My Soldering Iron Feels Hot, Is This Normal?
If it normal for the soldering iron to heat up. Usually the manual states a certain duration of time before the soldering iron must be turned off or turned to standby mode as it cools down.
Does This Method Work For Desoldering Other Things Too?
The method stated above absolutely works for desoldering other things as well such as diodes or microcontrollers on your PCB.
Is There A Tool That Makes This Really Easy?
If you want a very nice tool that will desolder for you without you worrying about all of the steps above, there is something called a desoldering tool that will heat up the joint and suck it all in one simple step.
All you do is plug it in, maintain the tool, and then press the button everytime you are pressing the tip against a solder joint. Many keyboard enthusiasts recommend the Hakko FR-301. However, it’s really pricey as you can see on Amazon. If you’re desoldering often, like really often, a tool like this can really save you time.
Video Tutorial On How to Desolder a Mechanical Switch
Conclusion
We talked about all of the different supplies that you need to desolder a mechanical switch. Of course, you can desolder other electronics as well, but this guide was written specifically for mechanical switches.
Now you can do so with the utmost confidence that you won’t ruin your PCB or keyboard. Electronics are quite persistent and it’s tough ruining something in the first place.
The next step is to solder in your new switches or a switch replacement when you’re ready.
Hopefully this guide was helpful for you. Now go out there and desolder switches with confidence!