
You’ve typed on your mechanical keyboard with the same switches for too long. It’s getting boring, and it’s time for a change.
Everyone’s talking about those new fancy switches. Perhaps it’s time for you to try them out too.
In this article, we’ll talk through all of the tools required and the steps to removing and replacing your mechanical switches.
Be prepared for a brand new experience!
Warning: Using tools such as a soldering iron can result in accidentally burning yourself due to the high temperature settings of the soldering iron. Make sure that your environment is safe and that people around you know not to be close to the soldering iron when it is hot. Make sure that animals and children are not within the vicinity as well. Stay safe!
Tools Required
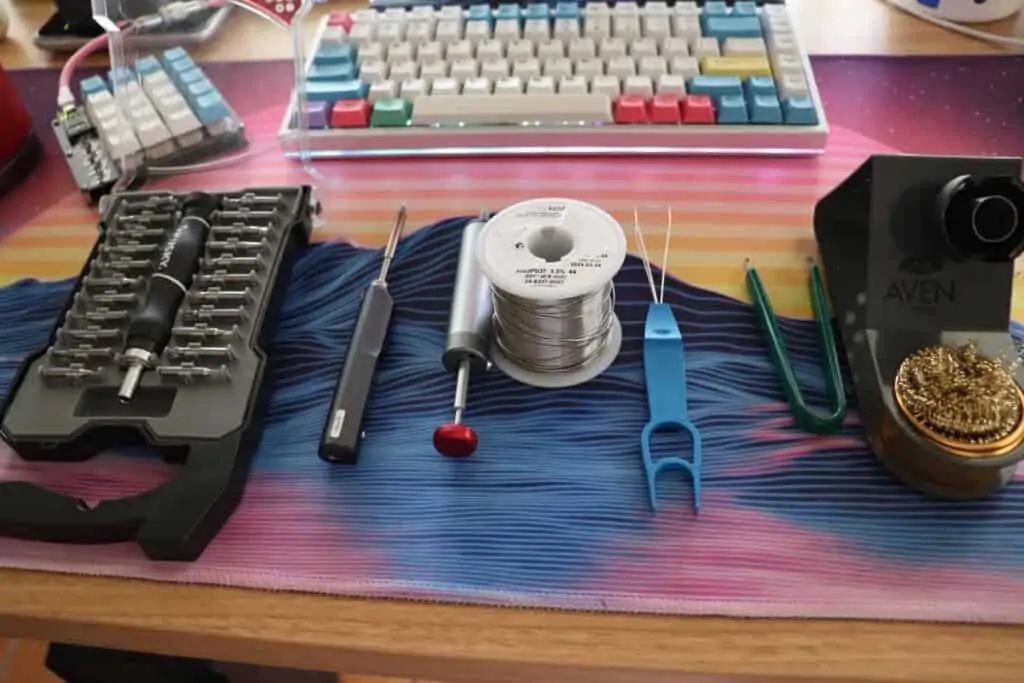
1. Soldering Iron With a Stand and Brass Cleaner
A good soldering iron will be one that has adjustable temperature controls. Whether this is a full soldering station or a handheld soldering iron, you will want to read through the instruction manual and understand how to turn on/off, change the temperature, and put the soldering iron on standby as well.
We use the TS100 soldering iron. It is portable and has a screen to tell you the temperature on the side of the iron. Another helpful item to have is a soldering stand with tip cleaner attached.
The reason we recommend a stand is primarily for safety reasons. You want to put your soldering iron in a safe space that will prevent you from accidentally touching it. Brass cleaner is essential to keep the tip of your iron clean after multiple uses. Or else the solder can accumulate on the tip, making the job messier.
Useful tip: If you want to have all of the products/gear that we recommend, check out our complete checklist for building a custom mechanical keyboard.
2. Solder Wire
Good soldering wire will help you get the job done right without all of the trouble. A good soldering wire will either be 60/40 Sn/Pb or 63/37 Sn/Pb. this means that its 60% tin and 40% lead. Having more lead in your solder will make desoldering easier and is ideal for fine electronics.
3. Solder Sucker
A solder sucker is a cost-effective and efficient way to desolder switches from a keyboard. These are also called desoldering pumps. Essentially, they suck up the liquefied solder using a pump that you press in for each use.
If you are rich and can afford a desoldering tool such as the Hakko FR-301, then do it. It will be make desoldering a billion times easier. You use it essentially like a drill (except that it heats up and sucks up solder).
4. Large Space Outdoors OR A Ventilation Fan
When working with solder, it is ideal to do so outdoors or with a ventilation fan. The fumes that emerge from heating up solder is toxic for you and can cause long-term breathing problems.
If you are outdoors, you’ll want the breeze to go away from your face.
5. Keyboard
Of course, you will need the keyboard that you want to replace switches on. Or at least the PCB (printed circuit board).
6. Switch Puller
Having a switch puller is useful for plate-mounted switches. If you’re working with PCB-mounted switches, you will not need to have a switch puller. It just helps you take off the switch from the plate.
7. Keycap Puller
Having a keycap puller is useful if you have not yet disassembled your mechanical keyboard. If you have your PCB ready to desolder and replace switches, jump right into the steps.
8. Precision Screwdriver Kit
Having a screwdriver kit is useful to take apart any mechanical keyboard and separate the PCB from its case.
9. Replacement Switches
Of course when replacing switches, you will want new switches to put in. Make sure that you’ve counted them properly, so that you won’t be left hanging.
I recommend having at least 3-4 extra because some switches come with bent pins (which can be really annoying to fix).
10. Small Flat-Tipped Pliers
Having a pair of pliers is extremely helpful if you happen to bend the pins of a switch when pressing them into the PCB.
Now that we have all of our supplies and tools, let’s get started.
How to Remove and Replace Mechanical Switches: The Steps
1. Disassemble Your Mechanical Keyboard

The first step to removing and replacing switches is to take apart your keyboard. You will want to end up with just your PCB, plate, and switches soldered into them.
If your keyboard doesn’t have a plate, then just the PCB and switches.
We want to remove the keycaps altogether as well as the case. Desoldering and soldering can be a messy job, so make sure you place all of your parts into a safe area.
This is where your screwdriver kit comes in. Look for all of the screws along the case, sometimes they’re under the rubber feet on the bottom.
Some keyboards, if they’re built entirely of plastic, will require you to pry the two pieces apart.
2. Determine Which Switch Needs to Be Replaced (Or All of Them)

If you’re only replacing one or two switches that aren’t working properly, then make sure you mark the switch on the back, so you know that you’re desoldering the correct switch.
For this step, using a dry-erase marker OR a permanent marker can work. I mean, no one else will see your marked switch, so why not?
It’s better than desoldering the wrong switch.
If you’re desoldering your entire board, then you won’t need to mark anything.
3. Prepare Your Workstation (Safety First!)

For a work station, we recommend working outside or in a room that’s well ventilated. If you’re indoors, we recommend having a ventilation fan to suck up all of the solder fumes away from you.
These fumes are toxic and can lead to poor breathing and asthma if exposed for long periods of time.
Make sure you also have a heat-insulated mat (you don’t want to burn the table that you’re working at).
Alongside this, it’s good to have on a pair of eye protection as well. It doesn’t have to be fancy lab goggles, just a pair of glasses will do. We like to use blue-light reducing glasses, just because we have them on all the time.
4. Turn On Your Soldering Iron

Turn on your soldering iron to a temperature between 300 and 350 degrees Celsius. It will depend on your environment and solder wire what temperature will work best for you.
Make sure that the iron is heated up all the way before trying to use it.
5. Add Leaded Solder to Your Solder Joints (If Your Keyboard Was Factory-Soldered)

If your keyboard came from a company such as Ducky, Corsair, Razer, Logitech, etc, then it’s best to add leaded solder to the joints.
This will make it easier to suck them up using a desoldering pump.
If you do skip this step and decide you want to try it without adding solder, it may be hard to suck the solder out. Leaded solder stays liquefied for a longer period of time, allowing the solder sucker to do its job.
If you soldered the keyboard yourself using high-quality leaded solder, then you may skip this step because your solder is already easy to work with.
6. Prepare Your Solder Sucker
Having your solder suck at the ready, prime the pump by pressing it down. Also make sure the silicone tip has no rips or tears.
Every once in awhile, make sure you clean the desoldering pump too. That makes it work more efficiently and will save you time. Your solder sucker will come with directions on how to clean it.
7. Suck Up The Solder From Each Switch

Now that your joints are ready to be desoldered, let’s get started.
Temperature: For desoldering, a temperature of 350-380 degrees Celsius is recommended. This is because you are using air to suck up the solder. The air will cool the solder and make it harder to move. Having a higher temperature will keep the solder in its liquid form longer.
Press the heated soldering iron’s tip onto the joint, making sure to heat up the pad and the pin. You will notice the solder liquefy after about 2 seconds.
Press the solder sucker’s silicone tip against the pad, encompassing the soldering iron and the pad. Push the button to suck the solder up.
Repeat until the solder is removed. If you see that the solder refuses to budge, it is recommend to lay down more solder into the joint and try sucking it again.
Repeat this for every switch that you wanted to take off.
After this is done, you may turn your soldering iron off or put it on standby. It’s not good for your soldering iron to be on for too long, as it could heat up and overheat.
8. Remove Switches from The Plate and PCB
If your switch is PCB-mounted without a plate, for each switch you desolder properly, they’ll just fall down and out of the PCB.
If you build does involve a plate, then the switches will not move. Use your switch puller to pull it from the plate and PCB.
If the switch refuses to come out, then there may be solder remaining. Add solder into the switch joint and attempt to desolder it again.
9. Push In New Switches Into Plate and PCB

Now that all the switches are out, you’re ready to put new ones in there.
For this part, make sure to press the new switches all the way into the plate so that each pin is visible on the other side.
If you notice a pin isn’t visible, it’s likely that it’s been bent in the process. Pull it back out, use the pliers to straighten the pin, and then attempt to put back in.
If a switch pin bends over and over and over again, you can choose to use one of your extra switches (that’s what they’re there for, right?)
After all of the switches are pressed in, do a visual check of each switch to identify the switch pins.
Also, make sure that they’re in the right holes… you don’t want to have them laid out improperly.
For the modifiers, I like to place my keycaps on top of them just to make sure that they’re properly aligned and where I want them to be.
10. Solder Switches Onto the PCB
Alright, time to solder them again.
Turn back on your soldering iron, to a temperature of 300-350 degrees Celsius.
Get your solder ready in the off-hand. Heat up the pad and pin for about 2 seconds with moderate pressure, then feed your solder into the joint for about 2 seconds until you see that you have a small mountain (not a bubble) or solder.
You want to still see the switch pin, and the joint should look concave. For images and further reading on what a good solder joint looks like, see the Adafruit Guide to Excellent Soldering.
After soldering, go back and do a visual check that every pin was soldered properly and to your standards.
11. Test Your Switches and PCB

Now, of course, before we close the keyboard, we have to make sure that the switches are working properly.
Open up your switch tester of choice. We use Switch Hitter or VIA, if it’s VIA-compatible.
Press on each switch one-by-one to see if the switches are actuating properly.
If everything works, then it’s time to move on.
If something doesn’t work, look to see if the switch has two pins sticking out that are soldered. If they both are, then it could be a broken switch. If they’re not, then the switch may have a broken pin.
12. Re-Assemble Your Mechanical Keyboard
Finally, you’ve done it! You’ve replaced your mechanical switches, it wasn’t so hard, right?
Who am I kidding? It’s actually a pain, but the end result is worth it.
Now, put your keyboard back together and enjoy all of the wonderful sounds that it makes now with its new switches.
Conclusion
Replacing mechanical switches is a great skill to learn. It can bring new life to an old keyboard that you’ve been wanting to replace switches on.
It can also renew keyboards that were once deemed broken because it was chattering or not registering key presses properly.
Learning to desolder and solder switches opens new doors such as being able to modify your keyboard even further, without having to go out there and buy a new one.
You can now do more mods such as lubing your switches, modifying your stabilizers, replacing switches, and replacing stabilizers. It’s a brand new world out there.
Happy typing!