
Question and Answer
Ever since I started working a full-time job and starting a blog, I’ve been noticing wrist and forearm aches and pains when I get home from work. No matter how much massaging or stretching I do, the pain continues to stay. I don’t want to have repetitive stress injuries or carpal tunnel. Are there ways that I can minimize the risk of this happening? Will a mechanical keyboard help me? I’ve heard that ergonomic keyboards are meant for this purpose.
Ah, yes, ergonomic keyboards. When thinking of ergonomic keyboards, most people start to think about the keyboards that are curved and have some space in the middle where the keys are split. However, we can combine the durability and customization of mechanical keyboards with ergonomic principles to enhance your experience. Most likely, if you’re doing primarily typing, an ergonomic keyboard will help you reduce strain and decrease the likelihood of injury. We’ll be looking at ergonomics, different ergonomic mechanical keyboards, and how you can combine them together to reduce injury.
What is ergonomics?
A quick dictionary search of the word ergonomic says “relating to or designed for efficiency and comfort in the working environment.”
This is especially important for desk jobs or for people who sit down, type, and use your mouse all day long.
Ergonomic desk setup
Let’s talk about basic ergonomics first. There are many things that you can improve with your desk and chair setup prior to purchasing an ergonomic mechanical keyboard or mouse.
Most desks are in a fixed position, meaning that it is not possible to adjust them without having to add things or cut off parts of your table legs.
So, the desk doesn’t move, what things do? Your chair! Raise or lower your chair until your elbow makes a 90-degree angle when your forearms are resting on your desk.
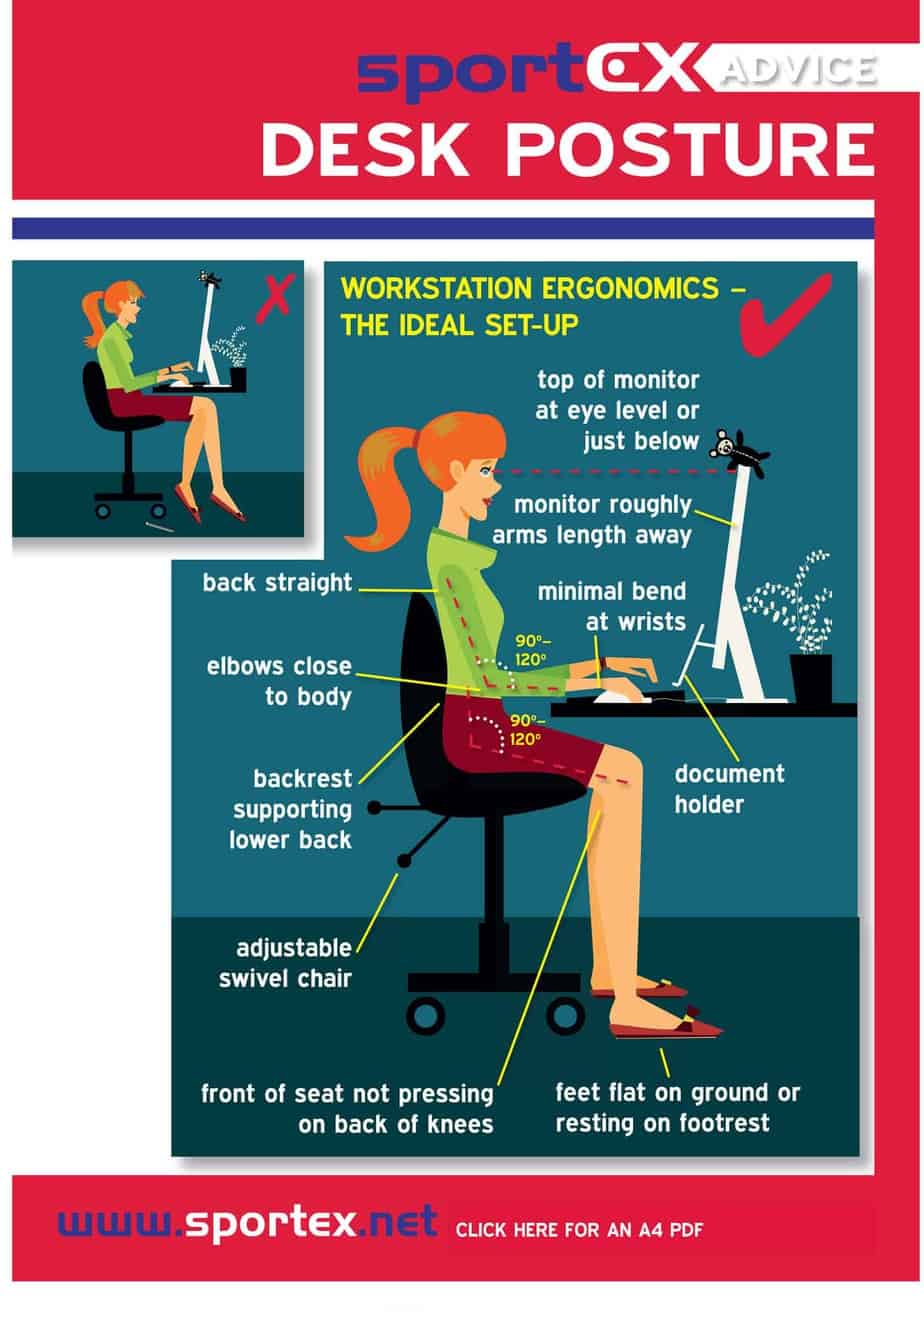
Let’s look at your feet next. If they’re touching the floor, then no problem. Are your feet dangling off a cliff? If so, then it’s time to add a footrest. The ideal angle for your knees would be 90 degrees.
If you do not have a footrest or footstool, you can use textbooks (like I do) or reams of paper. Personally, I prefer to use my old textbooks from when I was in college. Hello, Instrumental Analysis and Abnormal Psychology, serving a greater purpose.
The best hip angle is also 90-degrees. Side note: just because these are the ideal angles does NOT mean that it is okay to stay in this position all the time. Take a break, stand up, go to the bathroom, get water, walk around. The key is to give your muscles movement, so they do not tighten up in this position.
From my training and work experience as an occupational therapist, this ideal position is meant to strike a balance between muscle lengthening and muscle shortening of the muscles surrounding that joint.
Take your elbow, for example. If we simplify this, we have your biceps on one side and your triceps on the other. When you arm is straight, your biceps are fully lengthened, and your triceps are in their shortest position.
If you were to be stuck here for a long time, a muscle contracture (or permanent shortening of the muscle can occur). In this case, it would be the triceps. This is not a functional position to be in, imagine trying to live life with your arms straight out only.
Now the other position isn’t much better, fully flex your biceps, bringing your hands to your shoulders. The biceps are shortened here, and your triceps are lengthened. What can you do in this position? Not much.
So, we try to strike a balance, recommending the 90-degree position between the length of the biceps and triceps are “equal” in the sense that they’re not overly lengthened or shortened on either side.
The most important part here is to show you that muscles respond to long periods of time of stillness. Every few minutes, give your body a break. Stand up, move around, then sit down. It doesn’t need to be long.
Moving on, let’s adjust the monitor. You want the monitor about arm’s length away so it’s at a distance where you can read everything on the screen.
Your eye level should be at the top of the screen. Most monitors and desks will come where the height of the monitor is too low. You can do the same thing with the feet and put reams of paper or old textbooks under your monitor until it’s at eye level.
Like your bodies, your eyes also have muscles that contract and relax depending on the distance of where your eyes are focused.
Give these a break as well. One good thing to do is the 20-20-20 rule. You may hear this before.
Every 20 minutes look at an object 20ft feet away for at least 20 seconds. This will give your eye muscles a break. Looking closely at objects involves contracting muscles around the eyes to focus.
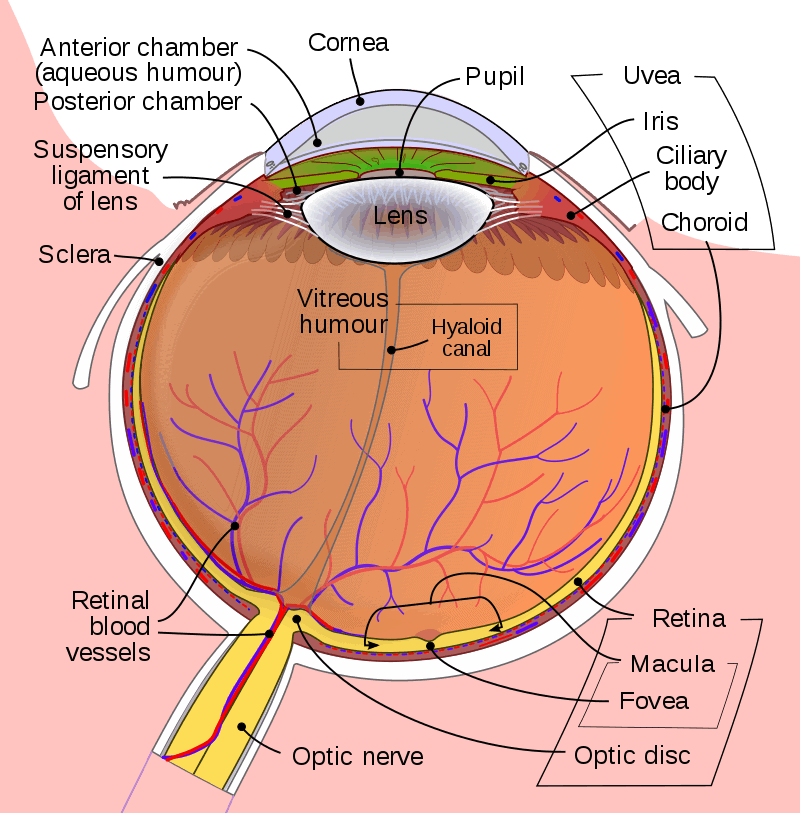
The ciliary muscles to the right and left of the lens are the muscles that are working hard to focus.
Next is the keyboard and mouse. Don’t even think about using your laptop keyboard or touchpad. This is a recipe for RSI (repetitive strain injuries). But if you’re here, you’re not doing that… are you?
Naturally where your hands land on your desk is where your keyboard should be. Place your mouse directly to the right of that.
You want your wrists to be in neutral position rather than in extension, pictured below.

When you type or use your mouse, your forearms are in pronation, with the palms turned down. This position is not ideal for long periods of time. Give your forearms a break and stretch them every break you take by stretching your wrists into extension (fingers up) and flexion (fingers down) against your desk or a wall.
Okay, now you know what’s up and how to set up your desk to maintain the ideal positions. And you know that you need to take frequent breaks. I should listen to my own advice. I’ll be back soon.
What makes an ergonomic mechanical keyboard different?
Okay, we’re back. Let’s talk about keyboards now since this article is getting quite lengthy.
Let’s first talk about the characteristics of ergonomic keyboards:
- Split design – Allows your arms to be in a V-position instead of A or H positions. This promotes external rotation of your shoulders where your chest and shoulders are open instead of closed (opening up for a hug). The longer we are stuck in internal rotation (hugging ourselves), the more rounded our shoulders become due to the lengthening to the muscles of our back and tightening of the muscles of the front shoulder and chest.
- Tenting – Tenting means being raised in the middle. This allows your wrists and forearms to relax. It also puts your forearms in a less pronated position, moving towards a neutral forearm position.
- Negative tilt – This means that it is lower at the back of the keyboard (the side facing away from you. This decreases the angle of wrist extension and promotes a neutral wrist position.
- Small and compact – Although this might not mean a big deal, it affects the way you use your mouse. The larger the keyboard, the further your mouse is from your immediate reach. This will cause you to reach forward, causing your shoulder blades to glide forward and out of their neutral position.
In addition to this, they can also have different key layouts. We’ll start to some of these key layouts as we look at some examples.
Examples of ergonomic mechanical keyboards
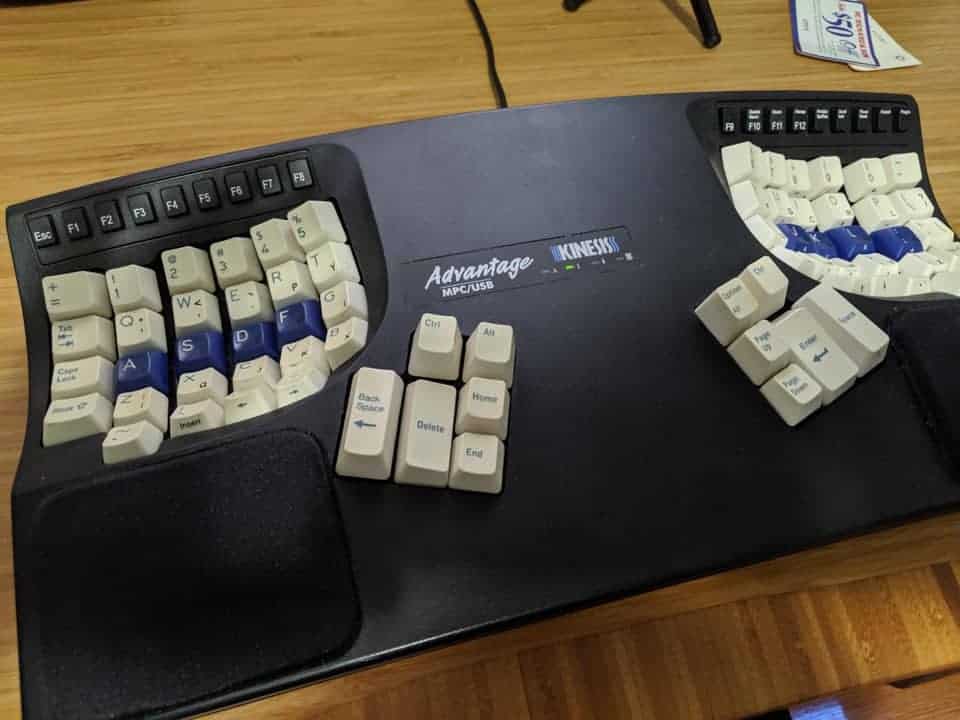
Kinesis Advantage 2 Keyboard
The Kinesis Advantage 2 is an ergonomic mechanical keyboard that advertises itself to be professional grade. It costs $349.99 on their website. Currently, it is $319 on Amazon. It is compatible with Mac and Windows and also comes with keycaps specific to each operating system.
dnvt8f/kinesis_advantage_1_customozed_w_cherry_mx_whites/
The keyboard has 2 colors: black or silver.
This keyboard has a fixed split in the middle with 20-degree tenting, a compact design with no number pad. It features scooped wells for the keys, allowing you to rest your palms and have your fingers naturally fall onto the keys without having to lift your fingers up to type each key.
It also features an orthogonal key arrangement, keys the same distance to the side, top and bottom to increase speed and comfort. When you type on your keyboard right now and move directly up or down, you’ll notice that you are between keys instead of on a key. This makes sure that you must move your hand or arm, although small, to press the key you want.
The arrow keys are there but they are in a non-standard layout. The left well has the left and right keys at the bottom right. The right well has the up and down keys at the bottom left. The keyboard is non-standard which may take time to get used to if you’re used to using your type layout.
In addition, this keyboard also has thumb keys for frequently used keys such as space, enter, and backspace. Using your strong thumbs rather than weak pinkies decreases the strain of your little fingers.
The keyboard has Cherry MX switches, for those of you that absolutely need the feels. And I know I do. The switch choices are limited to MX Browns or MX Quiet Reds.
For those of you who type with alternative layouts such as DVORAK, this keyboard lets you switch between QWERTY and DVORAK with a one-touch button. It is also fully programmable.
But there’s no number pad! With a one-touch key, you can turn on the 10-key number pad on the right hand well without any trouble. It’s basically got everything you need to be efficient and comfortable at your job.
Overall, this is an awesome ergonomic keyboard. It has a 3-year warranty. They also let you try their keyboard risk-free for 60 days without any hassle for returns.
Kinesis Freestyle Pro Keyboard
Okay, so that first one was a bit pricey. But so are health bills later. Most of the keyboards in this article will be relatively expensive.
Another keyboard in the Kinesis lineup, the Freestyle Pro keyboard, is another ergonomic mechanical keyboard. This one runs at $179 on their website. They have a cheaper model, the Freestyle 2, but this is not mechanical.
Like the other one, but with less features, this is a great entry-level ergonomic mechanical keyboard if you want to try it and see if it’s worth the money.
The Freestyle Pro has an adjustable split because each half of the keyboard is separated but attached with a 20” cable. It has tenting as well, but you must purchase additional accessories to customize it to your liking.
Without any accessories, the keyboard has a zero-degree slope. Additional palm cushions are available for purchase, but it does not come with the keyboard. This keyboard has a TKL design.
The two switch options are the Cherry MX Browns and the Cherry MX Reds. Unlike the Advantage2, this keyboard has a standard layout. The arrow keys are in the bottom right. There are no changes with the positions of the [ ], < >, and other keys like that.
This keyboard is also fully customizable with their SmartSet Programming Engine. It has 8 pre-programmed office hotkeys on the left side for commonly used shortcuts like cut and copy.
Kinesis also offers a 60-day risk free trial for this keyboard. It comes with Mac and Windows-specific keycaps.
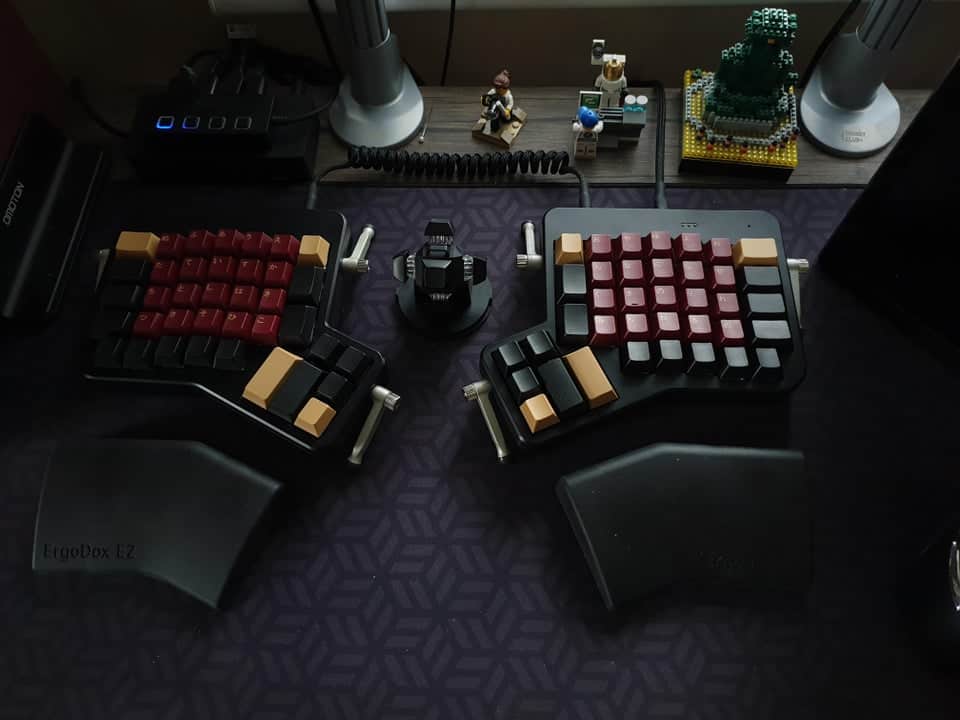
ErgoDox EZ
comments/cev6kw/gmk_red_samurai_ergodox_ez/
The ErgoDox EZ comes from the same company as the Planck EZ that we discussed in the article about Planck keyboards, which also could be an ergonomic option. However, in this post, we are discussing keyboards that are specifically advertised as ergonomic with the features listed above.
The ErgoDox comes in 2 colors: black or white. Its price ranges depending on the version that you purchase. The lowest price is $270 all the way to $354.
Let’s look at the options before we go into the features.
First, we get to pick the color: black or white. The color doesn’t make a difference to cost.
Next is lights, we have three options here. The lighting options both cost an additional $30. You can also pick to have no lights. We can either have backlit keys or mood lighting (underglow). I’ll go with backlit keys.
Next is a custom wrist rest. Because of the special design of the keyboard, using a normal wrist rest won’t work. The wrist rest is made of supportive silicon and is shaped to fit with the ErgoDox. I’ll say no to this. Again, this is an additional $30 and comes in two options: black or white.
After that is the tent kit to angle your board. Each kit costs an additional $30. There are two options: black or white. I’ll go with black here.
Now for the exciting stuff: switches! There are many options here. We have the following switches:
- Cherry MX Brown
- Cherry MX Blue
- Kailh Box Brown
- Kailh Box Red
- Kailh Box White
- Kailh Box Black
- Kailh Thick Gold
- Kailh Gold
- Kailh Silver
- Kailh Copper
I’ll go with Kailh Coppers here. No matter what switches you pick, the price is the same.
Total price ends up being $324 for all the above.
Shipping comes from Taiwan and returns will have to be mailed back as well, but they do offer a 30-day return policy. Although expensive, they keyboard gives you all the options!
Custom keycaps are a go ahead. Change your switches? It’s hot-swappable. It’s all fully programmable with its firmware. The people who designed this keyboard meant it to be at the top of ergonomic function but did not mean to design it with mass production in mind. It will take about 10 days of lead time before they ship them out.
Other Honorable Mentions
Truly Ergonomic has an ergonomic keyboard that they are currently pre-ordering for called the Cleave. It features a split design with orthogonal design. It also has palm rests and thumb buttons. There is a standard arrow cluster and productivity hotkeys in the middle columns.
It has an aluminum body with LED backlight. They do not tell you what switches they use, but the options are Silent, Clicky, or Linear. The price is $299, but they are doing a pre-order sale for $199.
Another honorable mention is the Atreus. This is a keyboard kit that you need to put together. They have different options: the full kit, the presoldered kit, partial kit, and the assembled keyboard. The cases are available in wood or acrylic. You can also purchase the Atreus62 and build that yourself too, this is a bigger layout with a number row.
As far as layout goes, this is like a 40% keyboard. It has no number row of function row. There are no arrow keys. It has orthogonal layouts for keys. It is fully programmable so layers can be programmed for all your needs.
The kit comes with all of the following parts and comes with a detailed assembly guide:
- Case which includes the top plate, switch plate, spacer pieces, and bottom plate
- Sandpaper for the wooden case
- Key switches, 42 tactile or clicky
- A-Star Micro controller
- 42 Diodes
- USB micro cable
- 42 keycaps
- 8 screws
- Rubber feet
comments/7fmeop/final_version_of_my_atreus_keyboards/
Another keyboard is the Ultimate Hacking Keyboard. This keyboard has a TON of features, and their website has an awesome video showing you all the details. This keyboard runs for $275.
Should you get one?
Personally, after typing for so long on a regular mechanical keyboard, I am seriously considering purchasing myself an ergonomic mechanical keyboard. Out of all of these, the ErgoDox EZ is calling my name with the tenting accessories. The Advantage2 seems great with all of its features, but the non-standard layout might be too much for me.
At around the same price as the Advantage2, the ErgoDox features hot-swappable sockets letting you change switches whenever you want. It also has standard keycaps that I can switch out if necessary. It is a hard decision to buy an expensive keyboard.
Is it worth it? Absolutely, of course. Is it the beautiful, slim, seek custom keyboard you might have wanted? No, it’s not.
But for the sake of your body, take care of it. It deserves a break, especially if you are working your desk job on a regular basis or typing your own personal blog/website/program.
I think my first custom build will be an ErgoDox… we’ll see. The PCB is $119 pre-soldered. And the case is $99. Just need to get switches, keycaps, and stabilizers.
Take care of yourself. I need to listen to this advice more because I’m typing on a non-ergonomic keyboard for extended periods of time. Break time! Happy typing!
For more options for ergonomic mechanical keyboards, check out the MechanicalKeyboards subreddit Wiki on this topic.
Sources
Ergonomic mechanical keyboards: A primer and roundup Keychatter.com
Office ergonomics: Your how-to guide Mayo Clinic